Start-Up Kit for Machine Learning – I

A few days ago, I have written an article regarding the “Paradigm Shift” in which Machine Leaning is one of the listed stuff. In this article, I will give some information regarding Machine Learning rather a start-up kit for getting started with it. To begin with…

What is Machine Learning?

Before understanding the concept behind Machine Leaning and the programming for the same let’s see how we used to work with traditional programming style.

Image title

In traditional programming, we usually provide the data (inputs) and the program (algorithm) that will consume those data to produce the result on a platform which is Machine. The machine just has the ability to execute what developer provides to it.

How Programming for Machine Learning is different from Traditional Programming?

But what if we provide the data(inputs) and some sample test results to the Machine on which it will infer the logic of how those inputs yield the sample test outputs to develop an algorithm. With the help of that algorithm, it will start predicting results for new inputs. Also while doing so it will refine the algorithm to improve the predictions.

Image title

But deducing an algorithm is not always as easy as said above. The Machine has to do a lot of processing and computation to predict an accurate result.

We will see more details later but for now, just for starters, we must know that Machine Learning is not just executing something to get the result but it is the other way around to develop a program based on the sample outputs.

Usage of Machine Learning:

Continue reading

Need of the hour: The paradigm shift in technology

There come times when we need to shift from an existing level to the next level reason being to stay ahead in the race or to save self from being obsolete. This is known as Paradigm Shift meaning switching from what you have to a new but feasible level.

And in the world of technology, this shift is nothing but mandatory as every day or the other we see a new, fast, error-proof and cost-effective technology. In this short article, I would like to bring in some such areas where we are shifts rapidly.  This list might grow as is and I urge to keep them listed in the comments!

Continue reading

PUT or POST – Which one to choose!!!

When we develop a RESTFul application we use the HTTP methods (verbs) to create, modify or access to the resources from the application. So, what are these HTTP methods anyway? They are nothing but defines an action that the HTTP request will perform on the server.  These are the HTTP Verbs available to perform action :

  1. GET
  2. POST
  3. PUT
  4. PATCH
  5. DELETE

Most of these verbs are self-explanatory, right?

But, what about the POST and PUT ??? The most common answer is the POST for creating resources while PUT for updating. However, this is how it is being used but why?

In this article, I would try to explain the difference between POST and PUT…

Continue reading

Maven: A Brief look…

Every application regardless of small or big or huge we have to follow some procedures or cycles. Configuring these steps manually everytime we need to run that cycle is a very cumbersome job. For example Dependencies Management, Pre-Deployment Validations and Checks etc.

Maven came into existence for the purpose of eliminating most of the manual efforts and automate this process.

What is Maven?

It is well known as “The Build Tool”, but I believe it is more than just “A Build Tool” given the facts of its capabilities, but in this tutorial, we will stick to basics of Maven.

  • Create a Maven Project
  • Understand Build Cycle, Build Phase & Goals
  • Understand POM
  • Understand GroupID and ArtifactID
  • Parent POM Concept; Inheritance & Aggregation
  • Simple Maven Project.

Create a Maven Project: 

This is quite easy so I will save it for the last part of the article while creating a simple project, but for now, let’s understand how it works first!!

Understand Build Cycle, Build Phase & Goals:

Build Cycle(s): As I said before there are lots of procedure we have to follow for a build process and these are coined as “Build Cycle”. A cycle consists of one or more “Build Phase(s)” which runs sequentially and in turn, each phase has being assigned with one or more “Goal(s)”

Ex:

mvn clean dependency:copy-dependencies

Build cycle(s) is defined and can be executed as a whole. It signifies a stage of the build. Example: site – This is a build cycle that is responsible for documentation, clean – This is a build cycle that is responsible for gracefully clean up the maven directory where the compiled code resides and default – This is the default process that controls some of the base functionalities like validating the dependencies and so on…

Each Build Cycle contains sequential phases, we can invoke a phase directly from a build cycle. Build Phase run in a sequential manner, so when we execute a build phase, the phase(s) before that phase are also executed prior to the execution.

mvn install

When this above command is executed, all the phases before “install” are executed prior to that.

Now, Goal(s)… There are the granular level commands present in each build phase. If the Goal is associated with a single phase then we can call it directly else we can use the phase name and then the goal name separated by “:”.

mvn clean dependency:copy-dependencies

Understand POM (Project Object Model): 

This is an XML file that contains the information required by Maven to create the builds, like Project Name, ArtifactID, GroupID, Version, Dependencies, etc. This also defines the different build cycle, phases for building the application. Basically, this contains what and hows for the builds.

This file has to be kept in the root folder of the project and has to be named “pom.xml”. A simple pom.xml would be as follows.

Maven

pom.xml derives some information from the super POM which can be overridden in the pom.xml at the project level as well. Later, we will see how to inherit information from Parent POM to other POMs and also how to aggregate POM into parent POM.

Understand GroupID and ArtifactID:

These tags {<groupId> , <artifactId> and <version>} are like address or unique identifier of POM file. When we create a POM we define

  • Group ID as the organization web domain or if it is a common project we can add the project name as well.
  • Artifact ID is mostly the project name and this is used by Maven for naming the Jar file or War file.
  • A Version is a revision done on the POM/Project.

Parent POM Concept; Inheritance & Aggregation:

As Maven encourages the DRY principle, the capability is available to inherit the common properties from a parent project to sub-projects without repeating the same kinds of stuff. This is known as POM inheritance. Let’s see how to do that:

MavanParent.PNG

Also, there will be the scenario where there will be multiple sub-projects and we might have to aggregate all sub-project’s pom.xml into a parent pom.xml.

MavanModel.PNG

NB: <packaging>pom</packaging> – This means that the parent POM will be packaged as POM and would be used by reference only.

Hint: It would be very difficult to see from which POM the dependencies are pulled in, so to find the effective POM we can use the following command.

mvn help:effective-pom

Before jumping into the code to create a simple maven project with inheritance and aggregation, we will see one more concept in Maven i.e its folder structure.

DirectoryStructure.PNG

Simple Maven Project:

In this simple project, I will create a Maven Project which will be a parent project for another sub-project and in parent project, I will add a common dependency for javax.mail. I will then create a new maven project that will inherit the parent maven project’s pom.xml and have the parent (common) dependencies in it too.

Parent pom.xml

Child

Child pom.xmlParent Child project has the mail.jar dependency as well inherited from the parent even without mentioning the same in dependencies list in the child.

ChildWithDependancies

Hope this help in understanding Maven.

Thanks and Happy Coding,
Sovan


Spring Boot – Profiles…

Spring Boot is gaining its popularity like any thing in the present time and I know it will be a persistent player in the coming days as well. It there are some features that every technology has and it is every useful in enterprise applications. I am going to write about one “Profiles”.

What is Profiles ?

Every enterprise application has many environment like

Dev | Test | Stage | Prod | UAT / Pre-Prod

Each environment require certain setting specific to them, For Example, in DEV we do not need to check database consistency always whereas in TEST and STAGE we need to. These environment specific configurations are called as Profiles.

How do we maintain Profiles? 

Simple. Properties files!!
We make properties files for each environment and set the profile in the application accordingly so it will pick the respective properties file. Don’t worry we will see how to set it up.

This article will show how to setup Profiles for Spring Boot Application.

Let’s Start with setting up a Spring Boot Application from Spring Starter.

Screen Shot 2018-09-02 at 12.43.23 AM.png

Next, Import the Project into STS as Maven Project. Below is the project structure.
Screen Shot 2018-09-02 at 12.48.17 AM.pngIn this demo application we will see how to configure different database at runtime based on the specific environment by their respective profiles.

As DB connection is better to be kept in a property file so it remains external to application and can be changed, we will do so. But Spring Boot by default provides just 1 property file (application.properties). So how will we segregate the properties based on environment?

The solution would be to create more property file add “profile” name as suffix and configure Spring Boot to pick the appropriate properties based on the “profile”.

Create 3 more application.properties

  1. application-dev.properties
  2. application-test.properties
  3. application-prod.properties

Of course, application.properties will remain as master properties file but if we override any key in profile specific file the later will gain precedence. 

I will now define DB configuration properties for in respective properties file and add code in DBConfiguration.class to pick the appropriate settings.

Base application.properties

Screen Shot 2018-09-02 at 8.33.25 AM.png

In DEV we will use in-memory database

Screen Shot 2018-09-02 at 8.33.58 AM.png

In TEST, we will be using lower instance of RDS mysql database and in PROD higher instance of mysql database. (It’s price that matters…)

Screen Shot 2018-09-02 at 8.43.08 AMScreen Shot 2018-09-02 at 8.43.23 AM

We are done with properties files, let’s configure in DBConfiguration.class to pick the correct one.

Screen Shot 2018-09-02 at 8.48.41 AM.png

We have used @Profile(“Dev”) to let the system know that this is the BEAN that should be picked up when we set the application profile to DEV. Other two beans will not be created at all.

One last setting, how to let the system know that this is DEV or TEST or PROD?

For doing that we will use the application.properties to use the key as below.

spring.profiles.active=dev

From here, Spring Boot will know which profile to pick . Lets run the application now!!

Profile in DEV mode and in DEV it should pick H2 DB.

Screen Shot 2018-09-02 at 9.05.26 AM.png

Screen Shot 2018-09-02 at 9.07.25 AM

Change the profile to PROD, we will see mysql with HIGH Config for DB should be picked and the message would be overridden with PROD message.

Screen Shot 2018-09-02 at 9.09.29 AMScreen Shot 2018-09-02 at 9.09.44 AM

That’s it!! We just have to change only once at the application.properties to let Spring Boot know which environment the code is deployed and it will do the magic with setting.

Please visit the repository, to access the code to see this happening!!

Happy Coding
Sovan

Netflix Eureka – Microservice – Registry-Discovery

In the headline, we saw three buzzwords.

  1. Microservice
  2. Netflix Eureka
  3. RegistryDiscovery

What is the microservice?

In simple words, microservice(s) are clusters of small applications that work together in coordination to provide a complete solution.

When we say a lot of small application running independently together, then all will have their own URLs and PORTs. In that scenario, it would be very cumbersome to maintain all these microservice to run in synchronization and more importantly on monitoring. Even this problem will increase manifold when we start implementing load balancers.

To solve this issue we need a tool that will monitor and maintain the registry of all the microservice(s) in the ecosystem.

What is Netflix Eureka?

This is a tool provided by Netflix to provide a solution to the above problem. It consists of the Eureka server and Eureka clients. Eureka server is in itself a microservice to which all other microservice(s) registers. Eureka Clients are the independent microservices. We will see how to configure this in a microservice ecosystem.

I will be using Spring Boot to create few microservice(s) which will act as Eureka Clients and a Discovery Server which will be a Eureka Server. Here is the complete project structure.

microservice1

Let’s now discuss the Eureka Discovery Server

This is the Eureka server and for that, we have to include Eureka Dependency in the Project. Below is the pom.xml for eureka discovery server.

microService2

Also, we need to update the properties file for this project to indicate that is a discovery server and not a client.

eureka.instance.hostname=localhost
eureka.client.register-with-eureka=false
eureka.client.fetch-registry=false

To bind the discovery application to a specific port and name the application we need to add the following as well.

server.port=8000
spring.application.name=DiscoveryServer

microService3

One last thing to do is to Annotate the Spring Boot Application to enable this as Eureka Server. To do so we need to add @EnableEurekaServer.

microService4

Boot up the application we will see a UI provided by Eureka to list all the servers that get registered. But at this point we have none!!

microService5

Now, let’s add few microservice(s) into the ecosystem and register them to the discovery server. For this also we need to add dependencies required in each service and register the same to the server. We will see in the details below.

I have created three simple microservice (microservice1, microservice2, microservice3) with Spring Boot and each one running in its own port (8002, 8003 and 8004).

microService6

As a client, it should register itself to the server and that happens in the property file as below.

microService7

And the main application would be annotated with @EnableEurekaClient in each microservice.

microService8

Boot up this application to run in port 8004 and it will automatically register itself to the discovery server. In a similar manner, I have created two more microservice and register the same in the discovery.

microService9

We can see three servers are running in the ecosystem and we can monitor the status of these servers too.

This ease the monitoring of all the servers and there replica in case we have used the load balancer.

I hope this will help get started with using Discovery Server and Clients using Eureka…

Eureka! We are done!!


Reference to the GIT Repository containing the code used for this demo!

Happy Coding!!
Sovan

Deploying Spring Boot on Docker

Docker is currently a hot cake in the container based deployment areas where as Spring Boot is the same for Mircoservice development. Both Spring Boot and Docker together forms a great combo for developing microservice based application(s). In this article I will try to explain in very simple words

  • What is Docker and its benefits.
  •  What is Spring Boot Application and how to create a simple Spring Boot Application.
  • Hosting the Spring Boot Application in a Docker Container.

DOCKER CONTAINER :

This is a tool that makes it very easy to deploy and run an application by using containers. A container allow a developer to create a all-in-one package of the developed application with all its dependancies. For example, a java application requires java libraries and when we deploy it in any system or VM, we need to install Java in that as first. But in a container everything is kept together and shipped as one package. Docker container. Read this article for more information about Docker Containers.

SPRING BOOT APPLICATION :

Spring Boot is a framework that ease the development of web applications. It has a lot of pre-configured modules that eliminates the manual addition of dependancies for developing an application with Spring. This is the sole reason of this being one of the favourites creating MicroServices. Lets see now how to create a Spring Boot Application in few minutes.

Open Spring Starter  to create a Java Maven Application with Spring Starter Libraries.

Screen Shot 2018-08-20 at 2.56.59 PM

Provide the Artifact Group & Name and in dependancies add “Web” and leave everything else with default which would create a Maven project with java & Spring Boot. This will generate a ZIP which is to be imported into STS as a Maven Project.

Screen Shot 2018-08-20 at 3.08.38 PM

That’s it!! You have just created a Spring Boot Application in the workspace. Now, we would need to add a simple RestController so we can test the API.

Screen Shot 2018-08-20 at 3.12.46 PM.png

Upon running the application and accessing the endpoint of the API we will see the output “Simple Spring Boot Application” will be shown in the browser.

Screen Shot 2018-08-20 at 3.20.32 PM

We have successfully created and run the application in the embedded server of the IDE, but now we deploy the same in the Docker Container. For this we would have to create a Docker File that will contain the steps that will executed by Docker to create an image of this application and will be running that image from docker.

JAR file of this application:

As in the POX.XML we have defined that the packaging will be of type JAR, let us run the maven commands to create a JAR file for us.
Screen Shot 2018-08-20 at 3.40.41 PM

To do so, first clean up the target folder.

mvn clean       [This can also be done from IDE, Run as Maven Clean]
mvn install      [This can also be done from IDE, Run as Maven Install]
These command will create a “dockerdemo.jar” in the target directory of the working directory.

Screen Shot 2018-08-20 at 3.43.03 PM

What is a Docker File?

Docker gives the user the capability of creating there own docker images and deploy the same in the docker. To create your own docker image we have to create out own docker file.  Basically a  Docker File is a simple text file with all the instructions required to build the image.

Here is our Docker File :
Create a simple File in the project folder and add these steps in that file.

Screen Shot 2018-08-20 at 3.27.39 PM.png

FROM java:8
This line means this is a Java Application and will require all the Java Libraries so it will pull all the java related libraries and add to the container,

EXPOSE 8080
This means that we would like to expose 8080 to the outside world to access our application.

ADD /target/dockerdemo.jar dockerdemo.jar
ADD <source from where docker should create the image> <destination>

ENTRYPOINT [“java”, “-jar”, “dockerdemo.jar”]
This will run the command as the entry point. As this is a JAR and we need to run this Jar from within the docker.

These are the four steps for that will create an image of our Java Application to be able to run the docker.

Okay!! We have two pieces ready…

  1.  Java – Spring Boot Application
  2. DockerFile that will create the Image to be run in the Docker Container.

For loading these up in the Docker Container, we have to first create the image and then run that image from the docker container. We need to run certain commands in the folder that contains the DockerFile.

Screen Shot 2018-08-20 at 3.56.29 PM.png
This will create our image in the docker and loads up to the container.

Screen Shot 2018-08-20 at 4.00.43 PM

Now that we have the image ready to run… let’s do that with the following command…

Screen Shot 2018-08-20 at 4.06.44 PM.png 
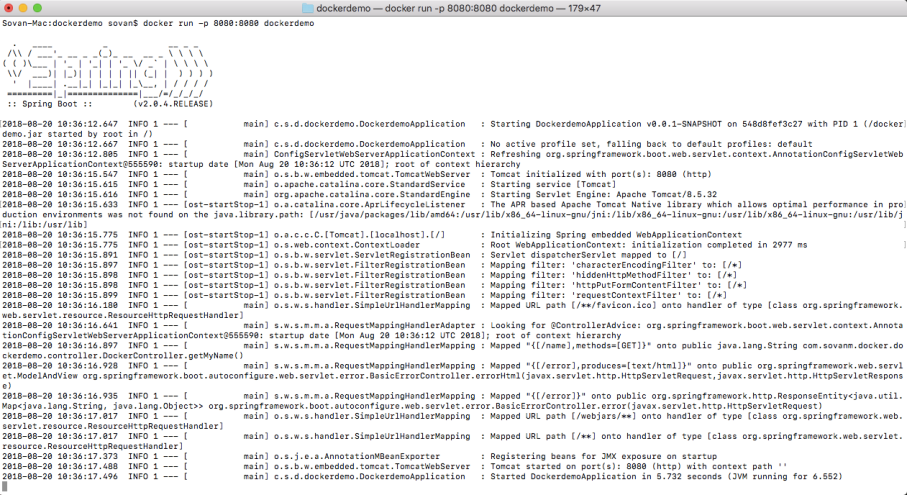
There you go.. Spring Boot Application Boots up.. and the server is running on the port (8080).

Screen Shot 2018-08-20 at 4.28.34 PM

Here we go…. The spring boot application is running from Docker Container 🙂

Hope this will help get started with Spring Boot Application and Docker Container Deployment

Happy Coding!
Sovan

GIT – The home for source code… #2

Welcome Back!

In the last blog, we saw how to install GIT and get started with it. Here, we will be covering few basic concepts of git, git commands, etc.

What will be covered in this part #2

  1. What is a repository?
  2. How to create a new repository or use an existing one?
  3. How to check the status of the repository?
  4. ….& many more

What is a repository?

A repository is a virtual area where GIT stores the codes and maintain the versions. This can be also thought of as the workplace for GIT. We can create our own repository or clone an existing repository as well.

Initialize a repository in local…

  • To initialize a repository i.e. to create a new repository we will use the “ git initcommand. This is one of the first steps to execute while using GIT.
  • This is a one time command used to create a repository which will create a “ .git directory in the working directory. This contains all the metadata required for git.
  • For the existing project, to make that a GIT repo, navigate to that directory and execute the GIT init command. This will make the working project directory a GIT repository.
  • The .git folder contains much information such as the current HEAD (currently checked out commits), Objects, etc.

Clone a repository to local…

  • To get an existing project from GIT repository to local is known as Cloning a GIT Repository.
  • This syncs all the files on the remote repository (coming next) to a local repository and then we can add and edit files and then push it to the remote repository.
  • $git clone https://username@bitbucket.org/myrepo/project_name.git
  • Once this is successful, subfolders would be created under local repository directory and all the files would be cloned into it.
  • This clone contains files, folders, metadata that GIT requires to maintain the changes made on the repository.

We have seen the two ways have the git workplace ready for use. But will start over again with initializing a new repository and take a deep dive into it.

Continue reading

GIT – The home for source code…

This article is about the source code versioning tool GIT. It became a direct choice for most of the projects for its ease is using and it is also reliable and faster than its counterpart present in the market. Please begin with some fundamental concepts related to GIT…

What is version control system?

We must have kept versions of our code by one mean or other by keeping the backup of the file, sending in emails so we can get it back later (Be careful! Companies keep an eye on that… 😛 😛 ). Version control systems are technologies rather tools that keep an eye and track the changes we do in our code throughout the lifetime of the project or the products. Editing anything in our codebase asks VCS to save the snapshot permanently which can be fetched later as we need.

What are some of the benefits of version control system…

  • Workflows
  • Versions
  • Developers
  • Histories
  • Automation

Continue reading

OAuth 2.0 Security workflow

SECURITY (using OAuth 2.0)


Security is essential to any web application. In CE Hub,  we have taken all possible measures to make the application secure. We are implementing spring security and OAuth 2.0 standards. Each request trying to communicate with the HUB must pass through the security layer of the application.

TD-CEHub-Communication

Fig 1. explains the communication between CE Hub and the different channels/devices.

There are three layers of security implemented:

  1. Authentication – The authentication is validating the user credentials. Only the users registered to the application can login providing their valid credential.
  2. Tenant verification – This layer verifies if the requesting user belongs to the tenant for which he/she is requesting the resources from. This restricts user from one customer/organization accessing other customers data.
  3. Authorization – Authorization means checking if the user is authorized to perform the requested task.              

Fig 1. The flow of requests and response through the security of the application.

The figure is explained below.

Explanation:

  1. The HUB is protected by the security layer (The portion in green background), which means any communication into or out of the hub must pass through the security layer.
  2. At first the any requesting client must provide his/her authentication credentials to get inside the authentication layer.
  3. After authentication the OAuth will provide Refresh token and Access token which will be used to access the next layer of the security that is authorization layer. (More about OAuth 2.0 in the section 2 below).
  4. In the authorization layer a particular user will be provided a grant and some role which will decide what all activities he/she can perform in the HUB.
  5. After passing through the Authorization layer there is a Tenant verification layer, which will validate if the user belongs to the requested tenant or not. (More about multi tenancy explained in section 3 below.)


  1. OAuth 2.0

      1.(a). Flow of OAuth 2.0 security

Flow security

Fig. 2. OAuth 2.0 flow diagram for explaining the security flow.

Here is a more detailed explanation of the steps in the diagram:

  1. The application requests authorization to access service resources from the user
  2. If the user authorized the request, the application receives an authorization grant
  3. The application requests an access token & refresh token from the authorization server (API) by presenting authentication of its own identity, and the authorization grant
  4. If the application identity is authenticated and the authorization grant is valid, the authorization server (API) issues an access token & Refresh token to the application. Authorization is complete.
  5. The application requests the resource from the resource server (API) and presents the access token for authentication
  6. If the access token is valid, the resource server (API) serves the resource to the application
  7. If the access token expires after a certain period of time, we can re-issue the access token using the refresh token so that the username and password doesn’t need to be provided at each authentication process.

The actual flow of this process will differ depending on the authorization grant type in use, but this is the general idea. We will explore different grant types in a later section.

1.(b). User Details

The user details are stored in the database in the USER table which is related to ROLE and RIGHT in separate tables, so that a particular user can only perform activities which are permitted to his role and right only. The password is stored in BCrypt encryption format which uses a brute force method to encode the passwords, and most important is the bcrypt does not have any method which allows decoding the password, so nobody can ever decode the secure passwords.

1.(c). Application Registration

Before using OAuth with our application, we must register your application with the service. This is done through a registration form in the “developer” or “API” portion of the service’s website, where you will provide the following information (and probably details about your application):

  • Application Name
  • Application Website
  • Redirect URI or Callback URL

The redirect URI is where the service will redirect the user after they authorize (or deny) your application, and therefore the part of your application that will handle authorization codes or access tokens.

1.(d). Client ID and Client Secret

Once your application is registered, the service will issue “client credentials” in the form of a client identifier and a client secret. The Client ID is a publicly exposed string that is used by the service API to identify the application, and is also used to build authorization URLs that are presented to users. The Client Secret is used to authenticate the identity of the application to the service API when the application requests to access a user’s account, and must be kept private between the application and the API.

1.(e). Authorization Grant

In the Abstract Protocol Flow above, the first four steps cover obtaining an authorization grant and access token. The authorization grant type depends on the method used by the application to request authorization, and the grant types supported by the API. OAuth 2 defines four grant types, each of which is useful in different cases:

  • Authorization Code: used with server-side Applications
  • Implicit: used with Mobile Apps or Web Applications (applications that run on the user’s device)
  • Resource Owner Password Credentials: used with trusted Applications, such as those owned by the service itself
  • Client Credentials: used with Applications API access

Now we will describe grant types in more detail, their use cases and flows, in the following sections.

1.(f). Grant Type: Authorization Code

The authorization code grant type is the most commonly used because it is optimized for server-side applications, where source code is not publicly exposed, and Client Secret confidentiality can be maintained. This is a redirection-based flow, which means that the application must be capable of interacting with the user-agent (i.e. the user’s web browser) and receiving API authorization codes that are routed through the user-agent.

1.(g). Example Access Token Usage

Once the application has an access token, it may use the token to access the user’s account via the API, limited to the scope of access, until the token expires or is revoked.

Here is an example of an API request, using curl. Note that it includes the access token:

curl -X POST -H “Authorization: Bearer ACCESS_TOKEN“”https://localhost:8080/ceapi/v2/$OBJECT

Assuming the access token is valid, the API will process the request according to its API specifications. If the access token is expired or otherwise invalid, the API will return an “invalid_request” error.

1.(h). Refresh Token Flow

After an access token expires, using it to make a request from the API will result in an “Invalid Token Error”. At this point, if a refresh token was included when the original access token was issued, it can be used to request a fresh access token from the authorization server.

Here is an example POST request, using a refresh token to obtain a new access token:

https://localhost:8080/ceapi/oauth/token?grant_type=refresh_token&client_id=CLIENT_ID&client_secret=CLIENT_SECRET&refresh_token=REFRESH_TOKEN

1.(i). Token Store

We store all the tokens generated by the security process in the database so that even there is a system failure or un planned power shut-down the tokens generated will be available and they can be accessed after the system power gets restored.

Following are the six tables being used by the OAuth 2.0

  1. OAUTH_ACCESS_TOKEN
  2. OAUTH_APPROVALS
  3. OAUTH_CLIENT_DETAILS
  4. OAUTH_CLIENT_TOKEN
  5. OAUTH_CODE
  6. OAUTH_REFRESH_TOKEN

Some important tables are described below:

OAUTH_CLIENT_DETAILS contains the information related to access token and refresh token expiration time.

OAUTH_ACCESS_TOKEN stores all the access tokens.

OAUTH_REFRESH_TOKEN stores all the refresh tokens.

The tokens stored in the database are in encrypted format and are impossible to decode so even if someone gets access to database he/she can not get through the security of the application. The tokens are extrapolated to longblob format and uses bcrypt encryption policy.

2. Multi Tenancy

multy tenancy

Fig. 3. Fine grained multi tenancy applied in the application to segregate tenant data from each other.


The above diagram explains that despite of having the same physical resource fo the tenant management we have separated the data of one tenant from another using the domain name and tenant id.

Every data in the database will be associated with a tenant id so that we can identify to which tenant the data belongs.

multi 2

Fig. 4. Is the explanation of how one physical resource is separated from various tenants.

Fig. 4. This is how the virtual separation of single resource i.e. the HUB looks like.

As the HUB will be accessed by different clients we have also included the multi tenancy feature in the application. By including this a user from one tenant will not be provided grant to access other tenant’s resources.


In our context the tenant can be considered as a client or company,

Following is an example of the tenant feature:


Lets consider the following URL’s

https://www.company1.com/get-all-billofladings

https://www.company2.com/get-all-billofladings


In the above two example urls we can notice that we have company1 and company2 as the tenant identifiers.


We are using URL’s to identify tenants

In the above example the users of tenant1 will not be able to access the resources of tenant2 and viece versa. And if any user of tenant1 tries to access the resources of tenant2 he will be restricted to do so with 401 UnAuthorized response status and an error message.

To achieve this we are having a field called tenant in each table in the HUB which will separate the one tenant’s data from another.

By this architecture we can guarantee that we have the data related to one company secured from another company in database level.

Feedback/Comments are welcome

Thanks,
Kalyan